Gel polish is a popular choice for those who want long-lasting, chip-resistant manicures. However, applying gel polish can seem daunting at first. How to put on gel nail polish? This guide will walk you through the process step-by-step, so you can achieve salon-quality nails at home.
Before you begin, gather your supplies:
- UV or LED lamp
- Gel base coat
- Gel polish in your desired colors
- Gel top coat
- Nail file
- Buffer
- Cuticle pusher (optional)
- Nail clippers (optional)
- Cotton balls
- Nail polish remover (acetone-free is recommended)
- Paper towels
Prep Work is Key
- Wash your hands thoroughly with soap and water. This removes dirt and oils that can prevent the gel polish from adhering properly.
- Gently push back your cuticles with a cuticle pusher or orangewood stick. Trim any excess cuticles with nail clippers, if desired. Be careful not to cut too close, as this can cause bleeding.
- File your nails to your desired shape and length. Use a buffer to smooth out any ridges on the nail surface.

Applying the Base Coat
- Apply a thin layer of gel base coat to each nail. Avoid touching your skin or cuticles.
- Cure the base coat under the UV or LED lamp for the recommended time according to the lamp’s instructions. Times will vary depending on the lamp, so be sure to check the manual.
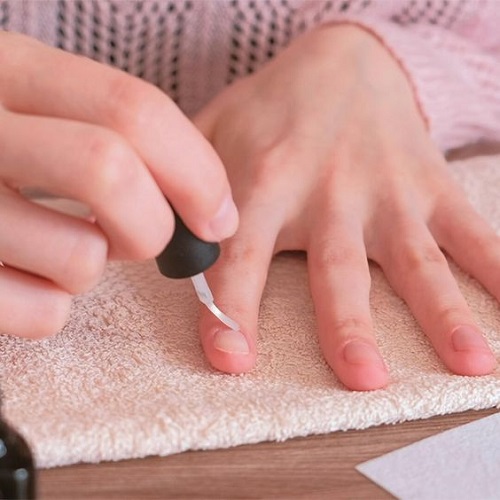
Painting with Gel Polish
- Once the base coat is cured, apply a thin layer of gel polish to each nail. Again, avoid touching your skin or cuticles.
- Cap the free edge (the tips of your nails) by brushing the polish slightly underneath the tips.
- Cure the gel polish layer under the lamp for the recommended time.
Repeat the previous step for a second coat of gel polish for a more opaque color.
Applying the Top Coat
- After your final coat of gel polish is cured, apply a thin layer of gel top coat to each nail. Don’t forget to cap the free edge.
- Cure the top coat under the lamp for the recommended time.
Finishing Touches
- Once the top coat is cured, use a cotton ball soaked in nail polish remover (acetone-free is recommended) to gently wipe away any excess gel polish on your skin.
- Apply cuticle oil to nourish your cuticles and add shine.
Tips for Long-Lasting Gel Polish
- Use high-quality gel polish products.
- Apply thin layers of gel polish and cure each layer completely.
- Avoid touching your nails while the polish is wet.
- Wear gloves when cleaning or doing dishes to protect your manicure.
- Apply cuticle oil regularly to keep your nails and cuticles hydrated.
Gel Polish Removal (Optional)
- When it’s time to remove your gel polish, you can’t simply peel it off. Peeling can damage your nails.
- Use a cotton ball soaked in pure acetone nail polish remover.
- Place the cotton ball on top of your nail and wrap it tightly with aluminum foil. Repeat this for all your nails.
- Let the polish remover sit on your nails for 10-15 minutes.
- The gel polish should now be soft and easy to remove with a gentle scraping motion using a cuticle pusher or orangewood stick. Be careful not to scrape too hard, as this can damage your nails.
- Wash your hands thoroughly with soap and water after removing the gel polish.
- Apply cuticle oil to hydrate your nails after removal.
Safety Precautions
Gel polish can irritate the skin.
Avoid getting it on your skin or cuticles. If you do get gel polish on your skin, wipe it off immediately with a cotton ball soaked in nail polish remover.
UV and LED lamps emit UV rays.
Avoid overexposure to these rays. Use a lamp with a timer and limit your curing time to the recommended amount.
With a little practice, you can achieve beautiful, long-lasting gel manicures at home. By following these steps and tips, you can enjoy chip-resistant nails for weeks. Remember, patience and practice are key!
Removing Gel Polish Safely
When it’s time to remove your gel polish, avoid peeling it off! Peeling can damage the top layers of your nails.
Here’s a safe way to remove gel polish:
- Use acetone nail polish remover.Acetone is a strong solvent, so be sure to work in a well-ventilated area.
- Soak cotton balls in acetone remover.
- Place each cotton ball on top of your nail and wrap it tightly with aluminum foil.
- Let the polish remover sit on your nails for 10-15 minutes.
- The gel polish should now be soft and easy to remove with a gentle scraping motion using a manicure tool. Be careful not to scrape too hard, as this can damage your nails.
Taking a Break from Gel Polish
It’s a good idea to take breaks between gel manicures to allow your nails to breathe. During this break, focus on keeping your nails healthy:
- Apply nail strengthener to help prevent chipping and breakage.
- Use a nourishing hand lotion to keep your hands and nails hydrated.
- Give your nails a chance to breathe by skipping polish for a week or two.
Enjoying Beautiful Nails
Gel polish can be a fun way to add color and shine to your nails. By following these tips, you can apply gel polish safely and keep your nails healthy throughout the process.
Remember, taking care of your nails is important for their overall health and appearance.
Practice Makes Perfect
Applying gel polish takes practice. Don’t get discouraged if your first few attempts aren’t perfect. With time and practice, you’ll be able to achieve salon-quality results at home.
Here are some additional resources that you might find helpful:
- Online tutorials: There are many great online tutorials that can visually guide you through the gel polish application process.
- Nail art blogs: Nail art blogs are a treasure trove of inspiration and tips for creating beautiful gel manicures.
Conclusion
Gel polish can be a fun way to add color and shine to your nails. By following these steps and tips, you can learn how to apply gel polish safely and effectively at home. Remember, practice is key to achieving flawless results. Enjoy experimenting and creating beautiful nails!